FAQ

- Home
- Faq
- Domande tecniche
- Chain guide installation
Chain guide installation
Below is the instructions manual that explains how to install and adjust the Flip Guide.

Flip Guide Instruction Manual
STEP 1
Loosen the bolt on the back side of the guide.
Loosen the bolt on the back side of the guide.
STEP 2
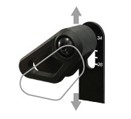
Adjust the height of the guide based on the chainring size then tighten the bolt. The center of the bolt should align with the chainring size.
Adjust the height of the guide based on the chainring size then tighten the bolt. The center of the bolt should align with the chainring size.
STEP 3
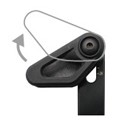
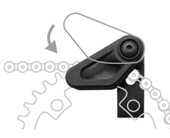
Rotate the guide up to make installation easier.
Rotate the guide up to make installation easier.
STEP 4
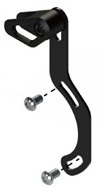
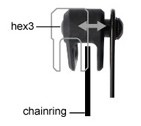
Attach the chain guide to the mounting points using hex bolts as shown below. Lightly tighten the bolts to allow for easier angle adjustment later.
Attach the chain guide to the mounting points using hex bolts as shown below. Lightly tighten the bolts to allow for easier angle adjustment later.
- E-type: hex 3
- Braze-On: hex 3
- ISCG-05: hex 4
- Bosch GEN4: hex 4
- Shimano STEPS: hex 4
- Direct Mount: hex 4
STEP 5
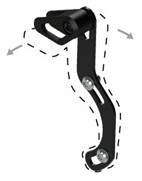
Install the chainring and chain then rotate the guide down. Observe the maximum outer limit, marked on the tube.
Install the chainring and chain then rotate the guide down. Observe the maximum outer limit, marked on the tube.
STEP 6
If necessary, tighten the hex 3 bolt to move the chain guide in or loosen it to move the guide out. Observe the maximum outer limit.
If necessary, tighten the hex 3 bolt to move the chain guide in or loosen it to move the guide out. Observe the maximum outer limit.
STEP 7
Adjust the angle of the back plate to the chain position then tighten the fixing bolts.
Adjust the angle of the back plate to the chain position then tighten the fixing bolts.
Note for FG-02
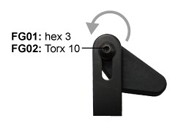
The height of the mount can be adjusted from the front of the chainguide. Unscrew the hex 3 that fixes the guide alloy tube, being careful to not lose the spring. Insert a Torx 10 in the alloy tube and turn right to loosen, adjust to the correct height then turn left to tighten.
The height of the mount can be adjusted from the front of the chainguide. Unscrew the hex 3 that fixes the guide alloy tube, being careful to not lose the spring. Insert a Torx 10 in the alloy tube and turn right to loosen, adjust to the correct height then turn left to tighten.
For technical assistance, please email: tech@gw-mfg.com
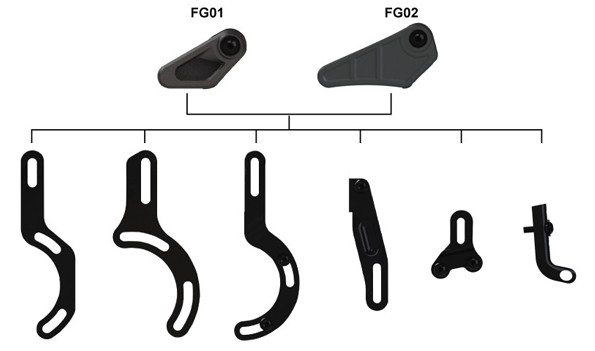
| Model | ISCG-05 | Bosch GEN4 | Shimano STEPS | Direct Mount | E-type | Braze-On | |
|---|---|---|---|---|---|---|---|
| Chainring | 26T-34T | 26T-38T | 26T-38T | 26T-38T | 28T-34T | 38T-50T | |
| Chainline | FG01 | 51-55mm | 47mm | 53mm | 46-50mm | 48-52mm | 41-45mm 45-49mm |
| FG02 | 52-55mm | 47mm | 53mm | 51-54mm | 50-53mm | 44-47mm | |